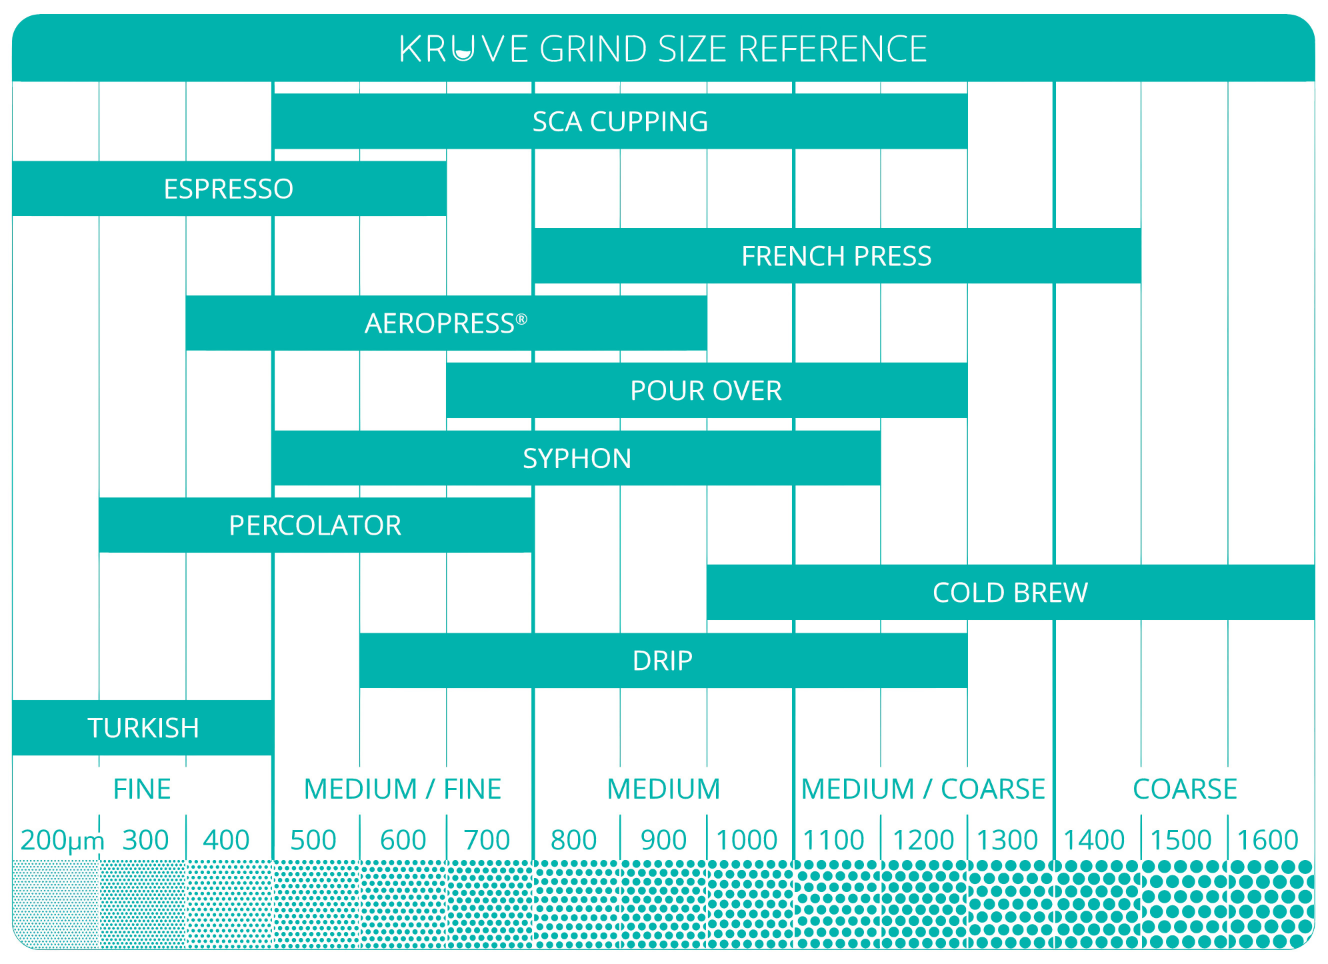
Coffee Grind Size Chart – A practical coffee grind size chart in microns, with starting points for espresso, moka pot, V60, pour-over, AeroPress, French Press, cupping, cold brew, Turkish coffee, and more. Start with the chart, then adjust by taste.
|
Brew method |
Starting grind size |
Approx. micron range |
|---|---|---|
|
Turkish coffee / Ibrik |
Extra fine |
40–220 µm |
|
Espresso |
Fine |
180–380 µm |
|
Moka pot |
Fine to medium-fine |
360–660 µm |
|
AeroPress |
Fine to medium |
320–960 µm |
|
V60 / Pour-over |
Medium-fine to medium |
400–950 µm |
|
Cupping |
Medium-coarse to coarse |
700–1200 µm |
|
French Press |
Coarse |
1000–1200 µm |
Grind Size Is Not Just One Number.
A grind size chart is a useful starting point, but real coffee grounds are never all the same size. Every grinder produces a range of particle sizes.
That range usually includes:
Fines: very small particles that extract quickly and can slow down water flow.
Middle particles: the main part of the grind, often responsible for balance and sweetness.
Boulders: larger particles that extract more slowly and can make coffee taste sour, weak, or uneven.
This is why two grinders can look like they are set to the same grind size but still produce different cups. One grinder may create more fines, while another may create a tighter distribution or more large particles. A grind chart tells you where to start. Particle distribution helps explain why the cup tastes the way it does.
How to adjust by taste
|
Problem |
Likely cause |
Try this |
|---|---|---|
|
Sour, sharp, hollow |
Grind too coarse / under-extraction |
Grind finer |
|
Bitter, dry, harsh |
Grind too fine / over-extraction |
Grind coarser |
|
Pour-over drains too slowly |
Too fine or too many fines |
Grind coarser, reduce agitation |
|
Pour-over drains too fast |
Too coarse |
Grind finer |
|
Weak but bitter |
Uneven grind: fines + boulders |
Adjust grinder, reduce agitation, check recipe |
|
Muddy cup |
Too many fines |
Grind coarser or use gentler pouring |
|
Thin cup |
Too coarse or too short brew time |
Grind finer or extend brew time |
A sensory cup that brews beauty in every pour.
Everything you need to know about coffee grind size
What is the best coffee grind size?
Trick question — there isn’t one. The “best” grind size depends entirely on your brewing method, and what’s perfect for espresso (~180–380 µm) would make pour-over taste like a mud puddle. Think of grind size like cooking temperature: there’s no single “best” heat for every dish. Use your brew method as the starting point, use this chart to find the range, then dial in to taste. The best grind size is the one in your cup right now that you actually enjoy.
What is a coffee grind size chart?
A coffee grind size chart is a guide that shows which grind range works best for different brewing methods. It usually lists grind sizes from extra fine to extra coarse and matches them with brewing methods such as Turkish coffee, espresso, moka pot, pour-over, AeroPress, French Press, cupping, and cold brew. Credit goes to Kruve.
What is coffee grind size in microns?
A micron (µm) is one millionth of a meter — roughly 1/70th the width of a human hair. You cannot see a single micron. You can, however, taste the difference between 400 µm and 800 µm in a pour-over, which is part of what makes coffee people the way they are.
Coffee grounds range from about 40 µm (Turkish coffee — nearly powder) to 1,500 µm (cold brew — coarse sea salt territory). Measuring in microns removes all the ambiguity: “medium grind” could mean anything, but 700 µm is 700 µm, measured by laser particle analysis. When a grind size chart uses micron values, someone actually measured the coffee — not just squinted at it and said “looks sandy.”
What are coffee fines?
Coffee fines are very small coffee particles. They extract quickly and can increase body, strength, and bitterness. In pour-over brewing, too many fines can slow down drawdown and create a muddy or dry cup. Some fines are normal, but too many can make brewing less predictable.
Fines (<100µm) extract 3–5× faster than coarse particles. In any brew, they’re always over-extracted before the larger particles reach target extraction.
What are boulders in coffee grinding?
Boulders are the big coarse particles at the top end of your grind — typically above 1,000 µm in a pour-over setting. They’re the opposite of fines, and just as problematic. While fines over-extract in seconds, boulders barely extract at all within your normal brew window. They’re essentially hitchhikers: they take up space in your filter, they weigh down your coffee-to-water ratio, and they give almost nothing back in flavor.
In espresso, boulders create channeling — water finds the path of least resistance through the loose coarse particles, bypassing the rest of the puck. In pour-over, they contribute to a thin, underdeveloped, slightly sour quality. A grinder with high Span produces both fines AND boulders simultaneously, which is why an uneven grind tastes bitter (fines over-extracting) and weak (boulders under-extracting) at the same time. That’s genuinely impressive in the worst possible way.
What's the difference between grind size and grind distribution?
Most people only think about grind size — they turn the dial coarser or finer and taste the result. But grind size (D50) and grind distribution (Span) are two independent variables that affect flavor in completely different ways.
Grind size (D50): Controls extraction rate and total extraction yield. Finer = more surface area = faster and higher total extraction. This determines whether your coffee is under- or over-extracted overall.
Grind distribution (Span): Controls extraction evenness. At the exact same D50, a narrow distribution produces a cleaner, more balanced cup. A wide distribution produces a muddier, harsher cup — because different particle sizes are simultaneously under- and over-extracting.
A concrete example: Two grinders both set to D50 = 700 µm:
- Grinder A, Span 1.0: particles range roughly 350–1050 µm. Mostly in the sweet spot. Clean, sweet, clear.
- Grinder B, Span 2.0: particles range roughly 0–1400 µm. Significant fines + significant boulders simultaneously. Bitter AND thin.
What are D10, D50 and D90 in coffee particle distribution?
When you grind coffee, you don’t get a single particle size — you get a continuous range, from fine dust to coarse fragments. D10, D50, and D90 are three percentile markers on that distribution, measured by volume using laser particle analysis:
- D10 — 10% of your ground coffee (by volume) consists of particles smaller than this value. This represents the fine end of your grind — the particles that extract fastest.
- D50 — 50% of the volume is below this size. This is your median grind size — the number your grinder dial actually controls. When someone says “I grind at 700 microns,” they mean their D50 is 709 µm.
- D90 — 90% of the volume is below this size. This represents the coarse end — the larger fragments that extract last and slowest.

Coffee Grind Size Distribution D10 D50 D90
The wider the gap between D10 and D90, the more inconsistent your grind. The formula that measures this gap is the Span value — see the next question.
What is Span value, and why does a low Span mean better coffee?
Span is a single number that describes how wide or narrow your grind distribution is. A Span of 1.0 means your D10 and D90 are each half a median-particle-width away from the center — relatively tight. A Span of 2.0 means your distribution is twice as spread out.
Why it matters: A low Span means most particles are close to the target size (D50). They all extract at roughly the same rate — producing an even, balanced, predictable cup. A high Span means you have both very fine and very coarse particles in the same brew. The fines over-extract (bitterness, astringency) before the coarse particles even reach target extraction (thin, watery, under-extracted). Both happen simultaneously in the same cup.
Brew Method Grind Size
What grind size should I use for espresso?
Target D50: 180–380 µm — fine, almost powdery, with visible particles if you look closely.
Fair warning: espresso is the most sensitive brewing method to grind size. A shift of 10–15 µm can be the difference between a 22-second flow and a 40-second flow. The right grind is the one that produces your target shot time (25–35 seconds for a standard double), not a specific number. That target shifts with each new coffee bag, roast level, and sometimes even with humidity changes. Espresso demands daily recalibration. This is why espresso people are like that.
Start at your grinder’s fine end, pull a shot, adjust in tiny increments. Use flow time as your feedback, not taste alone.
What is the best grind size for moka pot?
Target D50: 360–660 µm — medium-fine, finer than pour-over but noticeably coarser than espresso.
The most common moka pot mistake: grinding as fine as espresso. A moka pot operates at only ~1.5 bar of pressure — far less than an espresso machine’s 9 bar. Too fine a grind creates so much resistance that the over-pressure safety valve opens, you get bitter over-extracted coffee, and potentially a mess. The correct grind should feel like fine sand when you rub it between your fingers — individual particles visible, but they clump slightly when pressed. If your moka pot sounds like it’s struggling, go coarser.
What grind size should I use for AeroPress?
Target D50: 320–960 µm— the widest range of any method, which is part of AeroPress’s appeal.
AeroPress is the most forgiving brewer ever made. Adjust the recipe to match the grind:
- Fine (320–500 µm) + short brew (1–1.5 min) + hot water (95°C) = espresso-style concentrate
- Medium (550–650 µm) + standard steep (2–2.5 min) = balanced filter-style cup
- Coarser (650–950 µm) + inverted method + longer steep (3 min) = clean, bright cup
If you’re just getting started: 550 µm, 90°C, 2 minutes, standard orientation. Adjust from there. AeroPress will not punish you for experimenting.
What grind size should I use for V60 or pour-over coffee?
Target D50: 400–950 µm — medium, roughly table salt.
This is your starting point. From there:
- Light roast / washed process → lean finer (400–650 µm). Dense beans need more extraction.
- Dark roast → lean coarser (700–950 µm). Soluble compounds release easily; over-extraction happens fast.
What grind size should I use for cold brew?
Target D50: 900–1500 µm — coarse, like rough sea salt or small peppercorns.
Cold water extracts coffee dramatically slower than hot water — no thermal energy, no pressure, just diffusion over time. You need large particles and a long contact time (12–24 hours) to reach target extraction. Grinding cold brew too fine is one of the most common home mistakes, producing an intensely bitter concentrate that no amount of dilution fixes. When in doubt: go coarser than you think you need to. A 24-hour cold brew at 1,400 µm will be cleaner, sweeter, and more complex than an 8-hour brew at 800 µm.
What grind size should I use for Turkish coffee or Ibrik?
Target D50: 40–220 µm — the finest your grinder can go, nearly powder.
Turkish coffee is unfiltered. The coffee is heated directly in water and served without straining — the ultra-fine particles stay suspended and slowly settle to the bottom of the cup. You want the fines here. The extraction is extremely high, producing an intense, syrupy, full-bodied result. Grinding too coarse produces a gritty, weak cup with unpleasant texture.
This is also the one brewing method where all the scary talk about fines causing bitterness gets a pass — because bitterness is calibrated and expected in a well-made Turkish coffee, balanced by the richness of the full-body extraction. Context matters.
What is the best grind size for Chemex?
Target D50: 600–900 µm — noticeably coarser than V60, similar to coarse sand.
The Chemex paper filter is thick and has very fine pores. Use the same grind as V60 and your brew will stall, over-extract, and taste like something that’s been sitting too long. Go roughly 15–20% coarser than your V60 setting as a starting point.
The reward for getting it right: Chemex produces one of the cleanest, most transparent cups of any brew method. Individual fruit notes become very distinct, and the cup has a wine-like clarity. It’s a high-ceiling brewer — when dialed in well, it’s exceptional.
What is the best grind size for cupping?
Target D50: 700–1200 µm — medium-coarse, coarse table salt.
The SCA cupping protocol specifies a grind to fit approximately 70–75% passing a 20-mesh sieve, which corresponds to roughly 850–1,100 µm. Cupping is an immersion method — grounds steep in hot water and settle — so it tolerates a wider distribution than pour-over.
Important note: the purpose of cupping is flavor evaluation, not optimized extraction. You’re assessing a coffee’s inherent character for sourcing and quality control. Consistency between samples matters more than dialing in your personal recipe. Use the same grinder, same setting, same dose, same water temperature for every cup you’re comparing. Cupping rewards consistency, not creativity.
Join us to build a grind setting converter that every coffee lovers can use.
Sign up as a volunteer and let’s work on something cool together.
Troubleshooting
Why does coffee taste bitter?
Coffee often tastes bitter when it is over-extracted. One common reason is that the grind is too fine, causing water to extract too much from the coffee.
Coffee extraction is governed by surface area and contact time. Smaller particles have dramatically more exposed surface area per unit of mass than larger ones — and surface area is where extraction happens.
The physics: Surface area scales with the square of radius, but volume (mass) scales with the cube. A particle half the diameter of another has 4× the surface area but only 1/8 the volume — meaning it has 4× more surface area per gram. A 100 µm fine particle has roughly 50× more surface area per gram than a 700 µm medium particle.
When you brew, hot water immediately saturates the fines. In a typical 3-minute pour-over:
- Fines (<100 µm): reach 30–40% extraction within the first 30–60 seconds — deep into over-extraction territory (bitter, astringent, harsh)
- Core particles (500–800 µm): reach 19–23% extraction over the full brew time — the target flavor range
- Boulders (>1000 µm): may only reach 10–15% — under-extracted, thin, sour in some profiles
The fines don’t disappear from the cup. Their over-extracted compounds (chlorogenic acids, harsh phenolics) blend with everything else — masking sweetness, suppressing clarity, and adding a persistent dry bitterness in the finish.
The solution hierarchy:
- Use a grinder with a low fines percentage (better burr geometry)
- Sift — physically remove the fines fraction before brewing
- Reduce water temperature — slightly slows fines extraction relative to larger particles
- Blind-shake after grinding — redistributes but does not eliminate fines; reduces clumping
What to do?
Try grinding coarser, reducing brew time, lowering agitation, or adjusting your recipe.
Why does my pour-over drain too slowly?
Three culprits, in order of likelihood:
- Grind too fine — most common. Even 20 µm too fine creates significant flow resistance. Coarsen by 5–10 clicks and retest.
- High fines percentage — your grinder may produce excess fines that clog filter pores regardless of the target grind size. This is a grinder quality issue. Sifting with a 300–400 µm screen before brewing is the fastest fix.
- Water temperature too low — cold water is more viscous and flows through slower. Use 92–96°C.
The practical rule: slow drain + bitter taste = too fine. Slow drain + good taste = don’t change anything. The goal is a good cup, not a specific drain time.
Why do two grinders at the same grind size taste different?
Because the dial number means absolutely nothing. A “5” on one grinder and a “5” on another are just mechanical positions — they share no universal standard.
But there’s a deeper reason even when two grinders are set to the same D50: grind distribution (Span). Two grinders both producing D50 = 700 µm can have completely different Span values. Grinder A at Span 1.0 produces particles tightly clustered around 700 µm — clean, consistent extraction. Grinder B at Span 1.8 produces a wide mix of fines and boulders — bitter and thin simultaneously. Same median particle size. Completely different cup. This is why grind consistency matters as much as grind size, and why “it’s the same number” is never a sufficient explanation.
Why does my coffee taste weak even when I use enough coffee?
Weak, watery, thin — that’s under-extraction. Your coffee didn’t give enough of itself to the water. Main causes:
- Grind too coarse — less surface area, slower extraction rate
- Water too cool — lower temperature = dramatically slower extraction
- Brew time too short — the water moved through before extraction completed
- Wrong ratio — try 1:15 (1g coffee per 15g water) as a pour-over starting point
The counterintuitive trap: you can also get hollow or flat flavor from severe over-extraction. When bitter compounds dominate, they suppress the perception of sweetness — the cup tastes like nothing interesting rather than distinctly bitter. If going finer makes it worse, try going coarser with more coffee and a longer steep.
Is grind size the same on every grinder?
No. Grinder settings are completely proprietary — “setting 15 on a Comandante” is meaningless on a Timemore, MOMENTEM, or any other grinder. Even two identical models from the same production run can have slightly different calibration points.
The only universal language for grind size is microns (µm). A recipe that says “700 µm” is transferable between any grinder, because you’re describing a physical particle size — not a dial position. When following someone else’s recipe on your grinder, ask for the D50 target in microns, then brew and measure until you match it. Dial numbers are not recipes. They’re hints.
Why do my grounds look completely different when I switch beans, even at the same grinder setting?
You’re not imagining it. Switch from a dense Ethiopian light roast to a Colombian natural, keep everything else identical, and you’ll see it immediately: different color, different texture, different particle size. The grinder didn’t change. The beans did — and beans are not interchangeable raw material. They’re wildly different objects going into the same machine.
Here’s what’s actually happening:
Beans are not all the same hardness.
Coffee bean density and hardness are determined by three things: growing altitude, processing method, and roast level. All three change how a bean fractures under the burrs.
High-altitude Ethiopian washed light roast — let’s call it the difficult one. Grown at 1,800–2,200 metres, dense from slow development, washed process (clean cell structure, no fruit residue), light roast (minimal cell wall breakdown, lots of moisture retained). This bean is hard. The burrs have to work significantly more to break it. At the same dial setting, the burrs are relatively farther from the breaking point — which effectively means the bean is fractured more aggressively before it passes through the gap. The result: you often get finer effective output than expected, with more fines, more angular particles, and a visually powdery-dusty appearance.
Colombian natural process — the more relaxed one. Natural process means the coffee dried with the fruit still attached. Residual sugars and fruit compounds penetrate the bean during drying, softening the cell structure. The bean is less dense, slightly more porous, and more brittle. At the same setting, it fractures earlier and more easily — producing coarser effective output, rounder particles, and often slightly clumpy grounds (those sugars are sticky).
Roast level compounds everything.
Light roast = hard bean. The roasting process removes moisture and CO₂ expands the cell structure — but light roasts stop before significant cell wall breakdown occurs. The bean fights back.
Dark roast = brittle bean. Prolonged roasting breaks down cell walls, removes more moisture, and essentially pre-cracks the bean. A dark roast will shatter at a coarser setting than the same bean roasted light.
The result: if you grind a light roast and a dark roast at the exact same dial position, you can easily get a 100–150 µm difference in D50. Same grinder. Same number. Different coffee.
What this means for you:
Your grinder setting is not a recipe. It’s a position. The recipe is the particle size in the cup — and to hit the same particle size with different beans, you need to adjust the dial every single time you switch coffees. This is not a failure of your grinder. It’s physics.
| Bean type | Tendency | What to do |
|---|---|---|
| High-altitude washed light roast (e.g. Ethiopian Yirgacheffe) | Grinds finer than expected, more fines | Adjust slightly coarser than your usual setting |
| Natural process (e.g. Colombian natural, Brazilian) | Grinds coarser, more clumping | Adjust slightly finer, consider a quick shake to break up clumps |
| Dark roast (any origin) | Very brittle, grinds coarser than expected | Adjust finer; also grinds faster — don’t be surprised |
| Low-altitude washed medium roast | Most “average” behavior | Your baseline reference setting lives here |
The practical takeaway: every time you open a new bag, brew one test cup at your usual setting before committing to a recipe. Your eyes already told you the grounds look different — trust that observation. Different grounds = different extraction = different cup. A few clicks of adjustment is all it usually takes.
Is a more uniform coffee grind always better?
Almost always yes — with one honest nuance.
A uniform grind (low Span) means all particles extract at the same rate, giving you clean, predictable, controllable flavor. For espresso, pour-over, AeroPress, and any precision method: more uniform is better, full stop.
The nuance: in long immersion methods like cold brew or French press, a slightly wider distribution means different compounds extract at different rates over 12–24 hours. Some experienced brewers argue this creates a more complex cold brew compared to ultra-uniform grinds. There’s something to it. But this is an edge case, not a reason to accept an inconsistent grinder. Control first, then experiment with intentional variation.
How do I know if my grind is too fine or too coarse?
Your cup tells you clearly. Trust it.
| Symptom | Likely cause |
|---|---|
| Bitter, harsh, dry finish | Too fine — over-extracted |
| Slow pour-over drain (>5 min) | Too fine |
| Weak, watery, thin | Too coarse — under-extracted |
| Sour or sharp acidity | Too coarse |
| Fast drain with no flavor | Too coarse |
| Balanced sweetness + clean finish | Just right |
One variable at a time. If adjusting grind size doesn’t fix it within 2–3 tries, check water temperature and brew ratio before assuming something is broken.
Why can’t I copy another grinder’s setting?
Because grinder dial numbers are machine-specific mechanical positions — they don’t correspond to any shared standard. The number tells you where the burr is relative to that grinder’s zero point (where burrs touch), which is different on every machine and every unit.
To transfer a recipe between grinders, convert to microns:
- Find the actual D50 of the original setting (from manufacturer data, if available)
- Use your brewing results — not the dial — to match that D50 on your machine
- Record your own equivalent dial position for future reference
There’s no shortcut. Every grinder needs its own dial-in. This is annoying, and it is what it is.
Why do different burrs taste different at the same grind size?
Two reasons, one physical and one geometrical:
1. Different distributions. Even at the same D50, different burr geometries produce different Span values and different fines percentages. This alone changes the cup significantly — cleaner or fuller, depending on the shape of the distribution.
2. Different particle shape. Burr geometry determines not just particle size but particle shape. Flat burrs tend to produce more angular, “shattered” particles with higher surface area per unit weight. Conical burrs produce rounder fragments. Angular particles extract slightly faster and can emphasize acidity and clarity. Rounder particles can produce slightly more body and sweetness. This is why some burr sets are described as “analytical” (clarity-forward) versus “juicy” (body-forward) — it’s not marketing language, it’s physics.
Should I grind finer or coarser for sweeter coffee?
Usually finer, but carefully. Sweetness compounds extract at medium extraction levels (roughly 18–22% extraction yield). Grinding finer increases extraction, initially developing more sweetness. But cross the line into over-extraction and bitter compounds dominate — sweetness disappears.
The practical guide:
- Sour/sharp/thin → grind finer (under-extracted, sweetness hasn’t developed yet)
- Bitter/harsh/dry → grind coarser (over-extracted, sweetness is buried)
- Balanced but want more sweetness without changing grind → lower water temperature slightly, or use the Pre-Breaking Burr (MOMENTEM) to widen distribution — more body and sweetness without changing D50
Should I adjust grind size or recipe first?
Grind size first. Always.
Your recipe (ratio, temperature, brew time) can compensate for a slightly off grind, but it cannot fix a fundamentally wrong grind size. If you’re too coarse, extending brew time helps somewhat but also risks uneven extraction as water flows unevenly through the loose bed. If you’re too fine, shortening brew time doesn’t save you — fines extract in the first 30 seconds regardless.
The sequence:
- Fix the grind to get extraction in the right ballpark
- Adjust recipe variables (temperature, ratio, pour pattern) to fine-tune
One exception: if you’re completely new to a coffee, start with a recommended recipe and a recommended grind setting together, taste the result, then make one adjustment at a time. The goal is to learn which lever does what — not to change everything at once and guess which change worked.
Does sifting coffee grounds actually improve taste?
Yes — and the science behind it is satisfyingly simple once you understand what’s actually in your grinder output.
Here’s the thing: when you grind coffee, you don’t get one particle size. You get a whole party of different sizes. Most of the guests are well-behaved — medium particles between 300–900 µm that extract at roughly the right rate and bring you sweetness, fruit, and complexity. But some guests are chaos. The ultra-fine particles below 100 µm — the ones we call fines — extract in the first 30–60 seconds and are severely over-extracted before your pour-over even finishes draining. They’re the reason your coffee sometimes tastes bitter and harsh even when you’ve done everything else right.
How much are we actually talking about?
We measured this with a laser particle analyzer. At a standard pour-over setting on MOMENTEM #3, approximately 3.35% of your ground coffee by volume is finer than 100 µm. That doesn’t sound like much — but those particles have enormous surface area and extract fast. In the time it takes your medium particles to reach the sweet spot of 18–22% extraction yield, your fines have already blown past 35%, deep into bitter territory. They can’t be unextracted. They’re in your cup.
Sifting with a 300–400 µm screen physically removes these problem particles before brewing. You’re not changing your grind size — you’re just evicting the troublemakers before they ruin the party.
What you actually taste when you sift:
| Without sifting | With sifting (300 µm) |
|---|---|
| Bitterness in the finish | Clean, softer finish |
| Muted fruit notes | Fruit and floral notes become distinct |
| Slight astringency | Smooth, no dry mouthfeel |
| Good body | Slightly lighter body |
The trade-off is real: sifting removes some body and mouthfeel along with the bitterness, because fines also contribute texture. Whether that trade-off is worth it depends on your coffee and your taste. For light roast, washed-process single origins where you want clarity — sifting is often a revelation. For a dark roast where you want richness and body — maybe skip it.
When to sift (and when to skip it):
- ✅ Pour-over, V60, Chemex, filter — high benefit, especially with lighter roasts
- ✅ Any coffee where you keep tasting bitterness despite correct grind size — sifting might be your fix
- ❌ Cold brew, French press — fines add body, and immersion brewing is forgiving anyway
- ❌ Espresso — sifting changes puck density and water flow resistance in ways that are hard to predict; not recommended unless you’re deliberately experimenting
- ❌ Turkish coffee — fines are the entire point. Do not sift your Turkish coffee. Seriously.
The bottom line: sifting is not a gimmick — it’s a direct physical intervention on the biggest cause of bitterness in home brewing. You’re not compensating for a bad grind; you’re removing the fraction that extracts out of control. The result in the cup is real and noticeable, especially for anyone who’s wondered why their pour-over tastes cleaner at a café than at home on the same beans.
What is double grinding, and does it improve coffee quality?
Double grinding is the practice of passing coffee through two separate grinding stages — a coarse first pass that breaks the whole bean into fragments, followed by a finer second pass that cuts those fragments to the target particle size.
The theory: When a whole coffee bean enters a single-stage grinder, it fractures unpredictably. Beans are not uniform — density varies across the bean, roast creates internal stress gradients, and the initial fracture creates highly irregular fragments. These irregular inputs produce a wide distribution of output sizes.
With two stages:
- First stage (pre-breaking): Whole beans are broken into coarser, more uniform fragments. The irregular “first fracture” variation is absorbed here at a coarse level where it has less impact on final particle size.
- Second stage (fine-cutting): Pre-broken fragments — now more regular in size — enter the cutting stage. Because the inputs are more uniform, the outputs are more uniform. The result is a narrower PSD and lower Span.
Historical context: At the 2017 World Barista Championship, Miki Suzuki demonstrated double grinding using two separate espresso grinders — a technique that produced measurably narrower particle distribution. In 2020, James Hoffmann published practical research showing that regrinding filter coffee through a second, finer setting produced cleaner, more balanced cups in controlled blind tastings. The technique attracted wide attention but remained impractical for daily use because it required two grinders.
How do I know if my hand grinder is actually consistent?
The honest answer: you cannot reliably assess grinder consistency from taste alone. A cup that tastes good does not prove your grinder is consistent — it may simply mean your recipe variables (temperature, ratio, brew time) are compensating for distribution inconsistencies. And inconsistency that “hides” at one recipe setting often re-emerges when you try different coffees or brewing methods.
The only reliable method is laser particle analysis.
Dynamic image analysis (such as the QICPIC system used in our R&D) or laser diffraction analysis measures tens of thousands of individual particles per sample and produces objective, quantitative data:
- Full PSD curve
- D10, D50, D90 values
- Span value
- Fines percentage below 100 µm
- Batch-to-batch repeatability